Getting Started#
In this guide we’ll walk you through setting up doxysphinx for your doxygen and sphinx project.
Note
This guide expects that you want to integrate doxysphinx in your own project. If you just want to testdrive it and see how things working we recommend to clone the repo, fire up vscode and enter the devcontainer.
Step 0: Prerequisites#
Please be sure to fulfill the following prerequisites.
Tip
You can also look at the source code of this project for reference - especially the
devcontainer has everything set up already.
Project requirements#
You need a project upfront with:
doxygen installed and configured.
sphinx installed and configured.
Needed tooling#
You should already have installed python, doxygen and sphinx. If yes - great! If not please install them:
Step 1: Installing Doxysphinx#
Doxysphinx is distributed as pypi package.
Install it with:
pip install doxysphinx
Note
If you have trouble installing/running the package, please look into our FAQ (section I.1) where we describe some alternatives.
Step 2: Prepare Doxygen Config#
Next you have to prepare your doxygen configuration file (doxyfile) to have compatible settings with doxysphinx.
The following settings are mandatory and will be checked by a validator if you use your doxyfile as input for doxysphinx (if you use the doxygen html output directory instead validation will be skipped):
Mandatory settings#
these settings are absolutely needed (Doxysphinx will throw detailed errors in case of incorrect ones):
OUTPUT_DIRECTORY       = <anywhere_below_you_sphinx_documentation_source_root!!!> # see note below

GENERATE_TREEVIEW      = NO   # Deactivate doxygens own treeview (as it doesn't look right)
DISABLE_INDEX          = NO   # Menu data is crucial for our TOC generation so it mustn't be disabled

GENERATE_HTML          = YES  # Keep sure that you generate HTML which needed for doxysphinx

CREATE_SUBDIRS         = NO   # NO is the default value and it should be no because doxysphinx can't handle subdirs right now.
Note
Why the heck the doxygen output_dir needs to live inside the sphinx docs root?
Right now for each doxygen html output file a rst file is generated with the same name/path but different extension.
We did this because sphinx will then automatically generate the html files for the rsts at the correct relative location -
and no doxygen-documentation-internal links will break - they just stay the same. However this has the implication that
the doxygen html output has to live inside/somewhere below the sphinx source directory (we recommend using something
like docs/doxygen/YOUR_LIBRARY_NAME/). If that isn’t the case for you doxysphinx will complain and exit.
But I don’t want my docs dir to get polluted with generated code!
Yes, we don’t like that either, but one of our design goals was performance and scanning htmls and correcting links is just one additional step that takes time and makes things more complicated.
Our recommendation is to just gitignore the generated doxygen docs dir. If you cannot live with it you could take a look at the alternatives.
Recommended settings#
these settings are optional but strongly recommended (you will be notified in case of some value deviations):
SEARCHENGINE           = NO   # deactivate search engine (as sphinx has it's own search)
GENERATE_TAGFILE       = <OUTPUT_DIRECTORY>/<HTML_OUTPUT>/tagfile.xml  # generate a tag file
                              # this could be stored anywhere, however we recommend to put it into the
                              # documentation output folder which is the value of the OUTPUT_DIRECTORY variable
                              # + the value of the HTML_OUTPUT variable (your have to expand it for yourself
                              # because doxygen has no mechanism to reference config settings that were defined
                              # beforehand.
                              # The tagfile is also needed for the doxylink extension

DOT_IMAGE_FORMAT       = svg  # generates nicer svg images
DOT_TRANSPARENT        = YES  # generate transparent images
INTERACTIVE_SVG        = YES  # to be able to scroll and zoom into big images

# if you want to use aliases instead of markdown fences for commenting (see syntax guide) you have to add
# something like this (which doesn't hurt either):
ALIASES                = "rst=\verbatim embed:rst:leading-asterisk" \
                         endrst=\endverbatim  # This allows you to use rst blocks inside doxygen comments with @rst and @endrst
Tip
Doxygen awesome is a stylesheet that makes doxygen documentation look beautiful. We strongly recommend using it because then the doxygen docs would fit far better with any sphinx theme. Just download/clone the doxygen awesome stylesheet and then add it to your doxygen config:
HTML_EXTRA_STYLESHEET = YOUR_DOXYGEN_AWESOME_PATH/doxygen-awesome.css
Step 3: Run Doxysphinx#
Now it’s time to run doxysphinx.
You can either do it manually or integrate it in your makefile, cmake, whatever…
Manually#
Note
Keep sure that you first run doxygen.
The doxysphinx cli/executable has the following commands/options.
Get help#
Show command and usage information. This will also show the most up to date documentation as this guide will only handle the basics:
doxysphinx --help
doxysphinx <command> --help
Build#
Build the sphinx rst documents out of the doxygen htmls.
doxysphinx build <SPHINX_SOURCE> <SPHINX_OUTPUT> <INPUT(S)> <--doxygen_exe> <--doxygen_cwd>
Arguments:
Variable |
Descriptions |
|---|---|
SPHINX_SOURCE |
The root of your sphinx source/input directory tree. |
SPHINX_OUTPUT |
The root of you sphinx output directory tree - where sphinx puts the generated html files to. |
INPUT(S) |
One or many inputs where each input could be either…
|
–doxygen_exe |
The name/path of the doxygen executable. If nothing is entered, the default value is “doxygen”. (OPTIONAL) |
–doxygen_cwd |
The directory where doxygen is executed. The default value is the current working directory. (OPTIONAL) |
Replace the following arguments:
Warning
Please note that sphinx has slightly different output directories depending on the arguments:
sphinx-build -b html SOURCE_DIR OUTPUT_DIR ...
the html output will be put to
OUTPUT_DIRso doxysphinx’sSPHINX_OUTPUTshould beOUTPUT_DIR.sphinx-build -M html SOURCE_DIR OUTPUT_DIR ...
the html output will be put to
OUTPUT_DIR/htmlso doxysphinx’sSPHINX_OUTPUTshould beOUTPUT_DIR/html.
Clean#
If you want to remove the files doxysphinx generated please use the clean command:
doxysphinx clean <SPHINX_SOURCE> <SPHINX_OUTPUT> <INPUT(S)>
Makefile integration#
Add/extend the following targets in your makefile:
clean:
  @doxysphinx clean <SPHINX_SOURCE> <SPHINX_OUTPUT> <INPUT(S)>

doxysphinx:
  @doxysphinx build <SPHINX_SOURCE> <SPHINX_OUTPUT> <INPUT(S)>
Now you just need to call the doxysphinx target right after your doxygen is running.
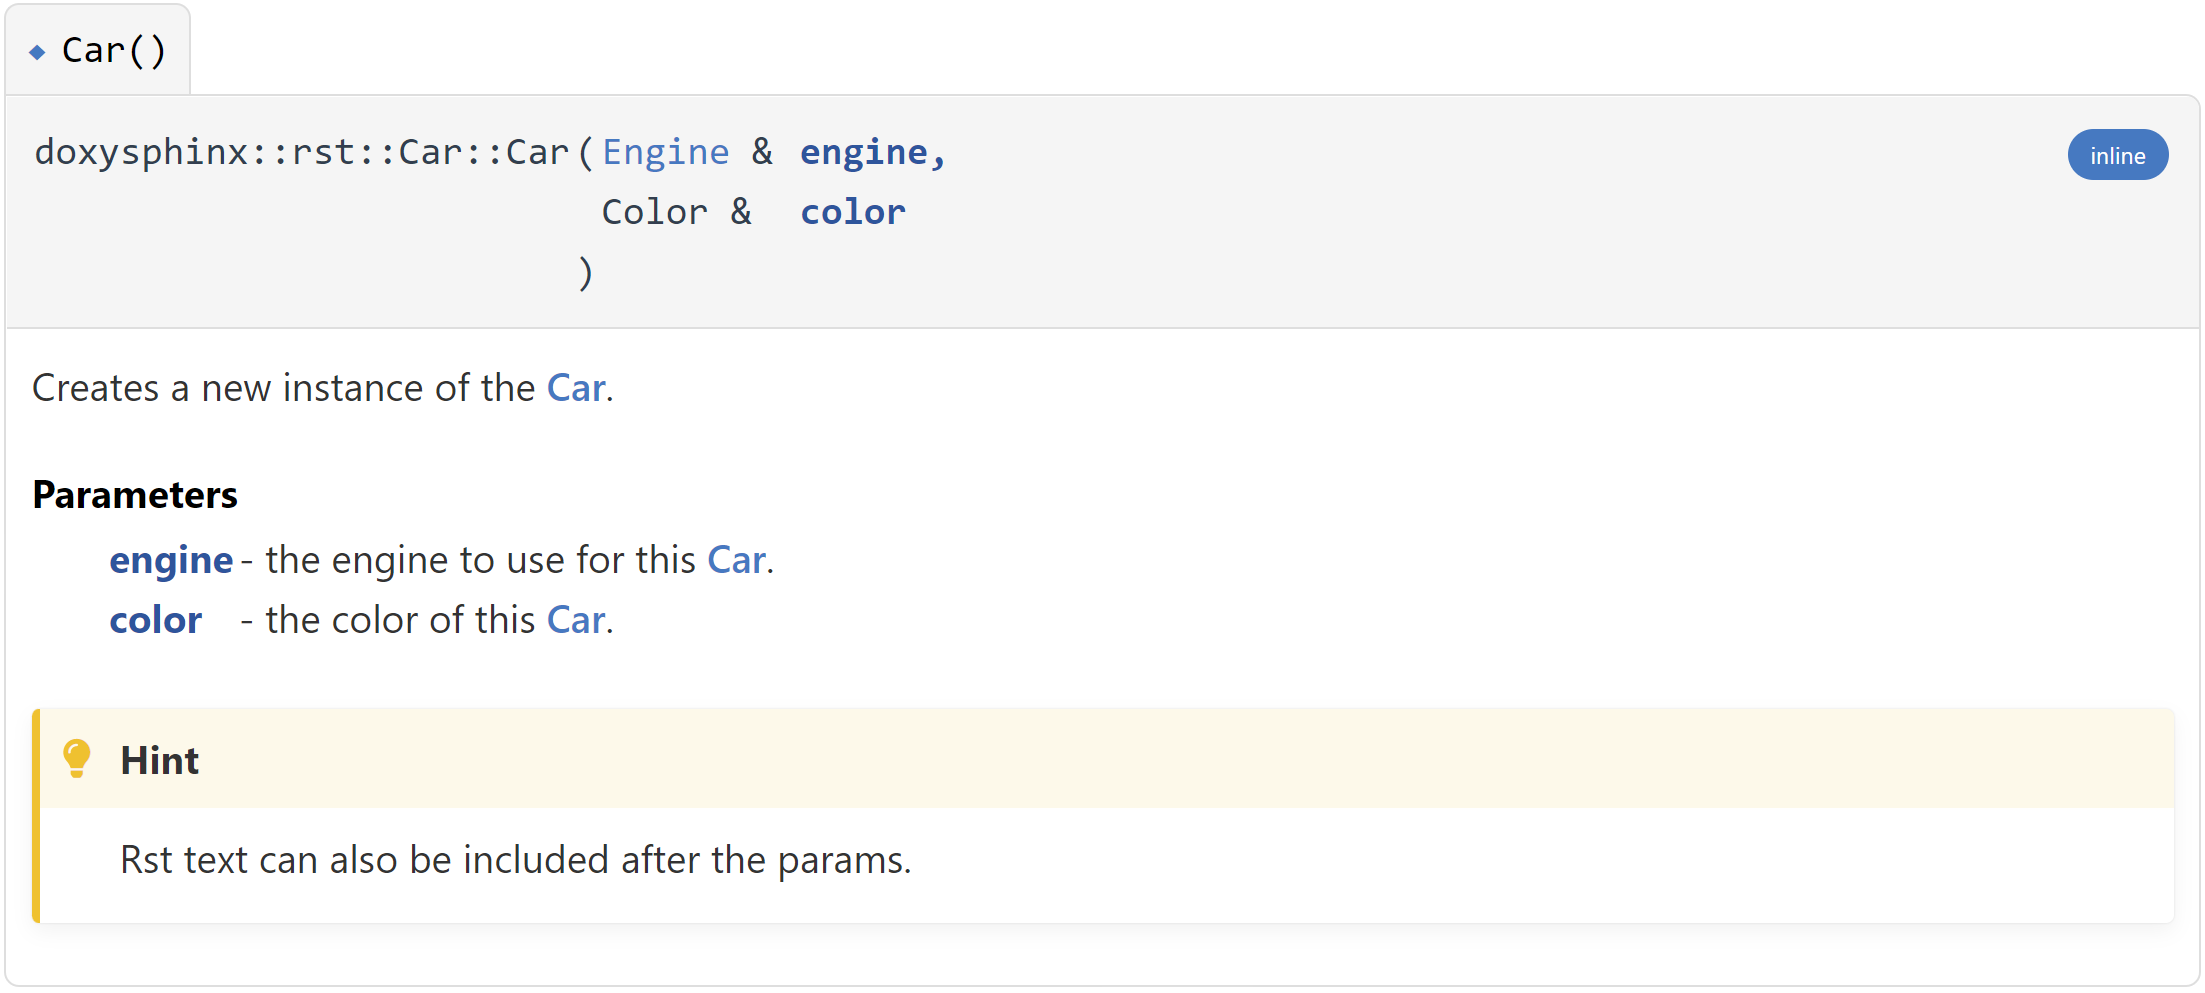
Step 4: Use rst snippets in your C/C++ Sourcecode#
Finally we can start using rst snippets in doxygen comments.
Open some C/C++ file and add a comment like this to one of your functions/methods/whatever:
/// @brief Creates a new instance of the Car.
///
/// @param engine - the engine to use for this Car.
/// @param color - the color of this Car.
///
/// @rst
/// .. hint::
///    Rst text can also be included after the params.
///
/// @endrst
Car(Engine& engine, Color& color) {};
Note the @rst and @endrst tags. Inside these tags you can write any rst code.
See also the Syntax Guide for a complete documentation on how to comment for doxysphinx.
Now run doxygen, doxysphinx and sphinx and look at the generated documentation. You should see something like this:
Done#
🎉 Congratulations you’ve completed the quickstart.
Further Recommendation#
Recommended Setup#
To link from sphinx documentation directly to doxygen documented symbols -> see our setting up doxylink guide.(Strongly recommended.)